Tom Sponheim (talk | contribs) Tag: sourceedit |
Tom Sponheim (talk | contribs) mNo edit summary |
||
| (18 intermediate revisions by 3 users not shown) | |||
| Line 1: | Line 1: | ||
{{GoogleTranslateLinks}} |
{{GoogleTranslateLinks}} |
||
| − | {{Updated| |
+ | {{Updated|6|5|19}} |
| + | <table cellspacing="2"> |
||
| ⚫ | |||
| + | <tr> |
||
| ⚫ | The ''' |
||
| + | <td valign="top" width="32%">__TOC__</td> |
||
| + | <td valign="top" style="padding:9px;"> |
||
| + | Below you will find information on the '''Minimum Solar Box Cooker'''. The Solar Cooking Wiki also provides an individual page for [[:Category:Countries|{{CountryCount}} different countries]] where you will find news, NGOs, manufacturers, and individuals working on solar cooking projects in that country. Links to possible funders are also available: |
||
| + | <imagemap>Image:Country2.png| |
||
| + | default [[:Category:Countries]] |
||
| + | desc none |
||
| + | </imagemap></td></tr> |
||
| + | </table> |
||
| ⚫ | |||
| ⚫ | The '''Minimum Solar Box Cooker''' is a simple [[box cooker]] that can be built in a few hours for very little money. Using ideas developed by many different people, [[Tom Sponheim]] and Mark Aalfs attempted to come up with the simplest design that they could devise at the time (1990). They named it the "Minimum Solar Box Cooker." What they didn't communicate with that name was that this is a full-power cooker that works very well, and is ''in no way minimum'' as far as its cooking power goes. |
||
| − | ==What |
+ | ==What you will need== |
| − | *Two [[cardboard]] boxes. |
+ | *Two [[cardboard]] boxes. Use an inner box that is at least {{CM|38}} by {{CM|38}}, but bigger is better. The outer box should be larger than the small box all around, but it doesn't matter how much bigger, as long as there is {{CM|1.5}} or more of an airspace between the two boxes. The distance between the two boxes does not have to be equal all the way around. Also, keep in mind that it is very easy to adjust the size of a cardboard box by cutting and gluing it. Note that you can build the [[Easy Lid Cooker]] with a single cardboard box. |
| − | *One sheet of cardboard to make the lid. This piece must be approximately 4 to 8 |
+ | *One sheet of cardboard to make the lid. This piece must be approximately {{CM|4}} to {{CM|8}} larger all the way around than the top of the finished cooker (the outer box). |
*One small roll of [[Reflective materials|aluminum foil]]. |
*One small roll of [[Reflective materials|aluminum foil]]. |
||
*One can of flat-black spray [[paint]] (look for the words "non-toxic when dry") or one small jar of black tempera paint. Some people have reported making their own paint out of soot mixed with [[Wheat paste|wheat paste]].<br /> |
*One can of flat-black spray [[paint]] (look for the words "non-toxic when dry") or one small jar of black tempera paint. Some people have reported making their own paint out of soot mixed with [[Wheat paste|wheat paste]].<br /> |
||
| + | {{Main|Paint}} |
||
| − | ::See main article: [[Paint]] |
||
| − | *At least 250 g (8 |
+ | *At least 250 g (8 oz) of white [[glue]] or [[wheat paste]]. |
[[Image:Ovenbagbox.jpg|right|250px|Oven cooking bags, available in most supermarkets, work very well for solar cooking applications.]] |
[[Image:Ovenbagbox.jpg|right|250px|Oven cooking bags, available in most supermarkets, work very well for solar cooking applications.]] |
||
| − | *One turkey-size Reynolds Oven Cooking Bag®. These are available in almost all supermarkets in the U.S |
+ | *One turkey-size Reynolds Oven Cooking Bag®. These are available in almost all supermarkets in the U.S. They are rated for {{Degree|204}} so they are perfect for solar cooking. They are not UV resistant; thus they will become more brittle and opaque over time and may need to be replaced periodically. A sheet of glass can also be used, but this is more expensive and fragile, and doesn't offer that much better cooking except on windy days. Plexiglas also works. See [[Glazing]] for more possibilities. |
==Building the Base== |
==Building the Base== |
||
| − | [[ |
+ | [[File:CooKit_trace_and_cut.jpg|left|250px]]Fold the top flaps closed on the outer box and set the inner box on top and trace a line around it onto the top of the outer box. Remove the inner box and cut along this line to form a hole in the top of the outer box (Figure 1). |
| − | Decide how deep you want your oven to be. It should be about 2.5 cm (1 |
+ | Decide how deep you want your oven to be. It should be about 2.5 cm (1 in) deeper than your largest pot and about 2.5 cm (1 in) shorter than the outer box so that there will be a space between the bottoms of the boxes once the cooker is assembled. Using a knife, slit the corners of the inner box down to that height. Fold each side down forming extended flaps (Figure 2). Folding is smoother if you first draw a firm line from the end of one cut to the other where the folds are to go. |
[[Image:Minimum_Solar_Box_Cooker_Figure2.gif|right]]Glue aluminum foil to the inside of both boxes and also to the inside of the remaining top flaps of the outer box. Don't bother being neat on the outer box, since it will never be seen, nor will it experience any wear. The inner box will be visible even after assembly, so if it matters to you, you might want to take more time here. Glue the top flaps closed on the outer box. |
[[Image:Minimum_Solar_Box_Cooker_Figure2.gif|right]]Glue aluminum foil to the inside of both boxes and also to the inside of the remaining top flaps of the outer box. Don't bother being neat on the outer box, since it will never be seen, nor will it experience any wear. The inner box will be visible even after assembly, so if it matters to you, you might want to take more time here. Glue the top flaps closed on the outer box. |
||
| Line 24: | Line 34: | ||
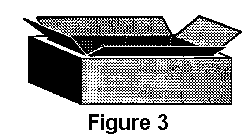
[[Image:Minimum_Solar_Box_Cooker_Figure3.gif|left]]Place some wads of crumpled newspaper into the outer box so that when you set the inner box down inside the hole in the outer box, the flaps on the inner box just touch the top of the outer box (Figure 3). Glue these flaps onto the top of the outer box. Trim the excess flap length to be even with the perimeter of the outer box. |
[[Image:Minimum_Solar_Box_Cooker_Figure3.gif|left]]Place some wads of crumpled newspaper into the outer box so that when you set the inner box down inside the hole in the outer box, the flaps on the inner box just touch the top of the outer box (Figure 3). Glue these flaps onto the top of the outer box. Trim the excess flap length to be even with the perimeter of the outer box. |
||
| − | Finally, to make the drip pan, cut a piece of cardboard |
+ | Finally, to make the drip pan, cut a piece of cardboard the same size as the bottom of the interior of the oven and apply foil to one side. Paint this foiled side black and allow it to dry. Put this in the oven so that it rests on the bottom of the inner box (black side up), and place your pots on it when cooking. The base is now finished. |
==Building the Removable Lid== |
==Building the Removable Lid== |
||
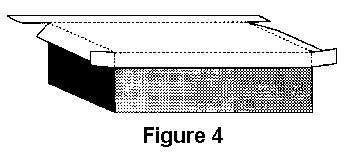
| − | [[Image:Minimum_Solar_Box_Cooker_Figure4.gif|left]]Take the large sheet of cardboard and lay it on top of the base. Trace its outline and then cut and fold down the edges to form a lip of about 7.5 cm (3 in). Fold the corner flaps around and glue to the side lid flaps |
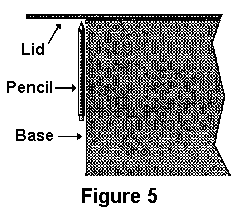
+ | [[Image:Minimum_Solar_Box_Cooker_Figure4.gif|left]]Take the large sheet of cardboard and lay it on top of the base. Trace its outline and then cut and fold down the edges to form a lip of about 7.5 cm (3 in). Fold the corner flaps around and glue to the side lid flaps (Figure 4). Orient the corrugations so that they go from left to right as you face the oven so that later the prop may be inserted into the corrugations (Figure 6). One trick you can use to make the lid fit well is to lay the pencil or pen against the side of the box when marking (Figure 5). Don't glue this lid to the box; you'll need to remove it to move pots in and out of the oven. |
[[Image:Minimum_Solar_Box_Cooker_Figure5.gif|right|230px]]To make the reflector flap, draw a line on the lid, forming a rectangle the same size as the oven opening. Cut around three sides and fold the resulting flap up forming the reflector (Figure 6). Foil this flap on the inside. |
[[Image:Minimum_Solar_Box_Cooker_Figure5.gif|right|230px]]To make the reflector flap, draw a line on the lid, forming a rectangle the same size as the oven opening. Cut around three sides and fold the resulting flap up forming the reflector (Figure 6). Foil this flap on the inside. |
||
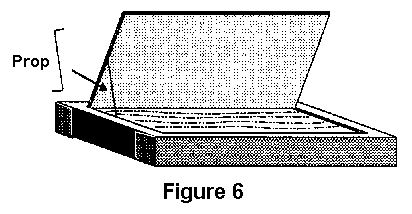
| − | To make a [[Props|prop]] bend a 30 cm (12 in) piece of hanger wire as indicated in Figure 6. This can then be inserted into the corrugations as shown. |
+ | To make a [[Props|prop]], bend a 30 cm (12 in) piece of hanger wire as indicated in Figure 6. This can then be inserted into the corrugations as shown. |
| − | [[Image:Minimum_Solar_Box_Cooker_Figure6.gif|left|300px]]Next, turn the lid upside |
+ | [[Image:Minimum_Solar_Box_Cooker_Figure6.gif|left|300px]]Next, turn the lid upside down and glue the oven bag (or other glazing material) in place. People have had great success using the turkey size oven bag (47.5 cm x 58.5 cm, 19 in x 23 1/2 in) applied as is, i.e., without opening it up. This makes a double layer of plastic. The two layers tend to separate from each other to form an airspace as the oven cooks. When using this method, it is important to also glue the bag closed on its open end. This stops water vapor from entering the bag and condensing. Alternately you can cut any size oven bag open to form a flat sheet large enough to cover the oven opening. |
==Improving Efficiency== |
==Improving Efficiency== |
||
| Line 45: | Line 55: | ||
==Making this cooker collapsible== |
==Making this cooker collapsible== |
||
{{Main|Collapsible Solar Box Cooker}} |
{{Main|Collapsible Solar Box Cooker}} |
||
| − | ::[[File:Collapsible_Solar_Box_Cooker.jpg|thumb|none|The [[Collapsible Solar Box Cooker]]]] |
+ | ::[[File:Collapsible_Solar_Box_Cooker.jpg|thumb|none|The [[Collapsible Solar Box Cooker]].]] |
==Plans in other languages== |
==Plans in other languages== |
||
| Line 54: | Line 64: | ||
*[http://solarcooking.org/italiano/minimum-it.htm Italian] |
*[http://solarcooking.org/italiano/minimum-it.htm Italian] |
||
*[http://solarcooking.org/farsi/minimum-fa.htm Persian] |
*[http://solarcooking.org/farsi/minimum-fa.htm Persian] |
||
| + | *[http://pl.gotowanie-i-suszenie-solarne.wikia.com/wiki/Kuchenka_solarna_skrzynkowa_Minimum_(plany) Polish] |
||
*[http://solarcooking.org/portugues/minimum-pt.htm Portuguese] |
*[http://solarcooking.org/portugues/minimum-pt.htm Portuguese] |
||
*[http://solarcooking.org/russian/minimum-ru.htm Russian] |
*[http://solarcooking.org/russian/minimum-ru.htm Russian] |
||
| Line 61: | Line 72: | ||
==See also== |
==See also== |
||
| ⚫ | |||
*The [[Easy Lid Cooker]] is a similar cooker with a much simpler lid. |
*The [[Easy Lid Cooker]] is a similar cooker with a much simpler lid. |
||
| ⚫ | |||
*[[Solar Cooking:Frequently-asked questions|Solar Cooking Frequently-Asked Questions (FAQ)]] |
*[[Solar Cooking:Frequently-asked questions|Solar Cooking Frequently-Asked Questions (FAQ)]] |
||
| − | *[[ |
+ | *[[Tips and tricks]] |
| − | *[[Health and safety]] |
||
| − | *[[Where solar cooking is possible]] |
||
| − | *[[Developing an intuitive feel for the dynamics of solar cooking]] |
||
| − | *[[Principles of Solar Box Cooker Design]] |
||
| − | *[[Solar cooking hints]] |
||
| − | *[[Advantages of solar cooking]] |
||
| − | *[[Books|Solar Cookbooks]] |
||
{{InterwikiLinks|Four solaire "Minimum"|Cocina Solar "Mínima"}} |
{{InterwikiLinks|Four solaire "Minimum"|Cocina Solar "Mínima"}} |
||
Revision as of 18:36, 26 January 2020
|
|
|
Last edited: 5 June 2019
|
|
Below you will find information on the Minimum Solar Box Cooker. The Solar Cooking Wiki also provides an individual page for 143 different countries where you will find news, NGOs, manufacturers, and individuals working on solar cooking projects in that country. Links to possible funders are also available: |
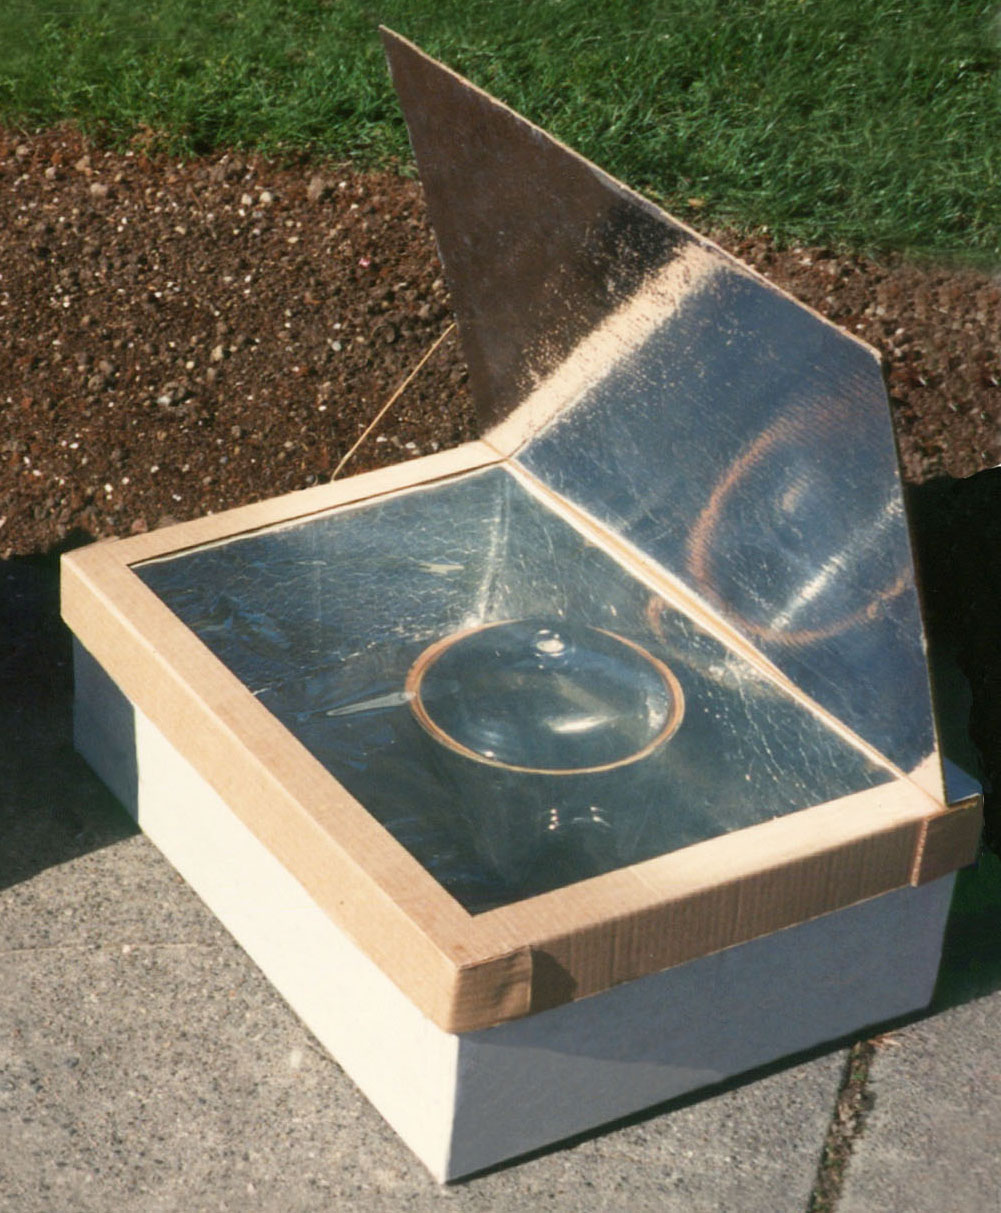
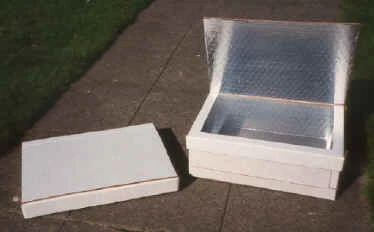
The Minimum Solar Box Cooker is a solar oven that you can build quickly from two cardboard boxes.
The Minimum Solar Box Cooker is a simple box cooker that can be built in a few hours for very little money. Using ideas developed by many different people, Tom Sponheim and Mark Aalfs attempted to come up with the simplest design that they could devise at the time (1990). They named it the "Minimum Solar Box Cooker." What they didn't communicate with that name was that this is a full-power cooker that works very well, and is in no way minimum as far as its cooking power goes.
What you will need
- Two cardboard boxes. Use an inner box that is at least 38 cm (15 in) by 38 cm (15 in), but bigger is better. The outer box should be larger than the small box all around, but it doesn't matter how much bigger, as long as there is 1.5 cm (0.6 in) or more of an airspace between the two boxes. The distance between the two boxes does not have to be equal all the way around. Also, keep in mind that it is very easy to adjust the size of a cardboard box by cutting and gluing it. Note that you can build the Easy Lid Cooker with a single cardboard box.
- One sheet of cardboard to make the lid. This piece must be approximately 4 cm (1.6 in) to 8 cm (3.2 in) larger all the way around than the top of the finished cooker (the outer box).
- One small roll of aluminum foil.
- One can of flat-black spray paint (look for the words "non-toxic when dry") or one small jar of black tempera paint. Some people have reported making their own paint out of soot mixed with wheat paste.
- Main article: Paint
- At least 250 g (8 oz) of white glue or wheat paste.
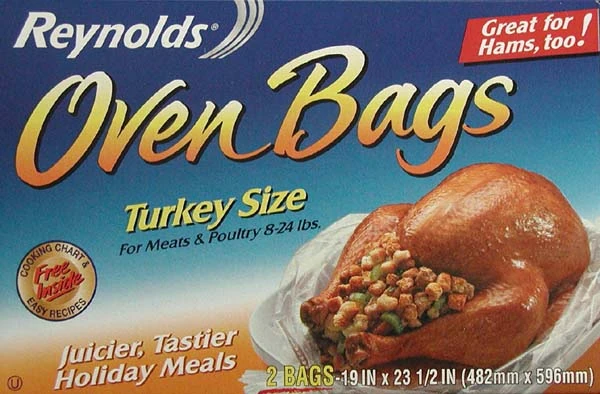
- One turkey-size Reynolds Oven Cooking Bag®. These are available in almost all supermarkets in the U.S. They are rated for 204 °C (399 °F) so they are perfect for solar cooking. They are not UV resistant; thus they will become more brittle and opaque over time and may need to be replaced periodically. A sheet of glass can also be used, but this is more expensive and fragile, and doesn't offer that much better cooking except on windy days. Plexiglas also works. See Glazing for more possibilities.
Building the Base
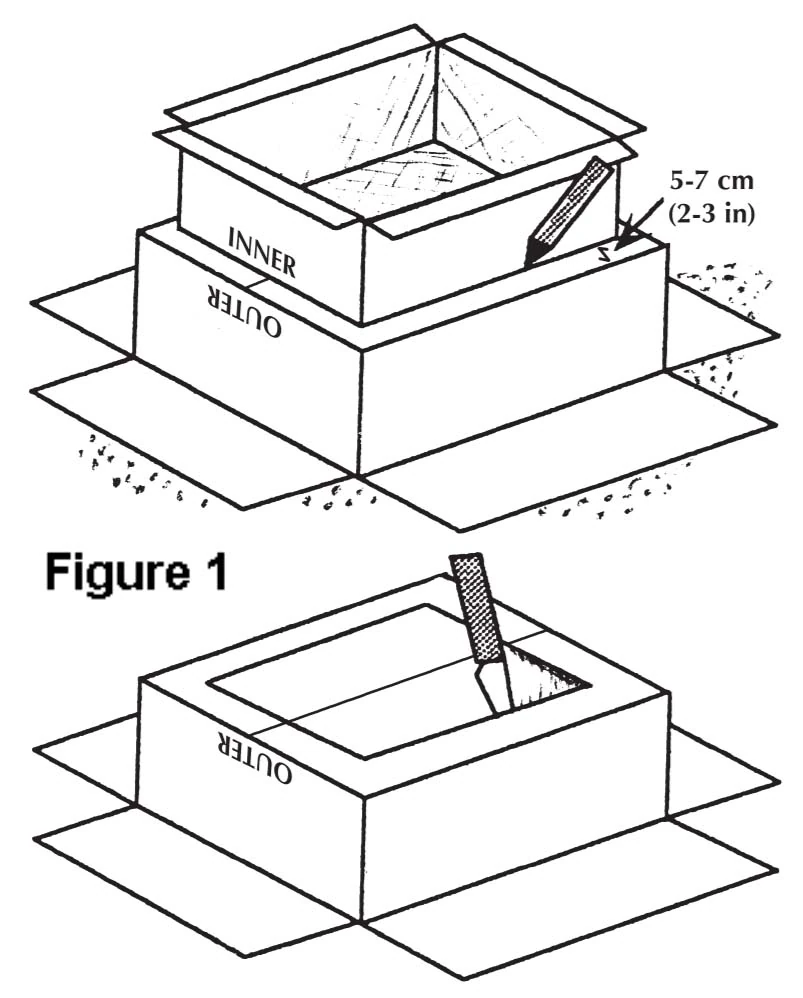
Fold the top flaps closed on the outer box and set the inner box on top and trace a line around it onto the top of the outer box. Remove the inner box and cut along this line to form a hole in the top of the outer box (Figure 1).
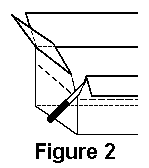
Decide how deep you want your oven to be. It should be about 2.5 cm (1 in) deeper than your largest pot and about 2.5 cm (1 in) shorter than the outer box so that there will be a space between the bottoms of the boxes once the cooker is assembled. Using a knife, slit the corners of the inner box down to that height. Fold each side down forming extended flaps (Figure 2). Folding is smoother if you first draw a firm line from the end of one cut to the other where the folds are to go.
Glue aluminum foil to the inside of both boxes and also to the inside of the remaining top flaps of the outer box. Don't bother being neat on the outer box, since it will never be seen, nor will it experience any wear. The inner box will be visible even after assembly, so if it matters to you, you might want to take more time here. Glue the top flaps closed on the outer box.
Place some wads of crumpled newspaper into the outer box so that when you set the inner box down inside the hole in the outer box, the flaps on the inner box just touch the top of the outer box (Figure 3). Glue these flaps onto the top of the outer box. Trim the excess flap length to be even with the perimeter of the outer box.
Finally, to make the drip pan, cut a piece of cardboard the same size as the bottom of the interior of the oven and apply foil to one side. Paint this foiled side black and allow it to dry. Put this in the oven so that it rests on the bottom of the inner box (black side up), and place your pots on it when cooking. The base is now finished.
Building the Removable Lid
Take the large sheet of cardboard and lay it on top of the base. Trace its outline and then cut and fold down the edges to form a lip of about 7.5 cm (3 in). Fold the corner flaps around and glue to the side lid flaps (Figure 4). Orient the corrugations so that they go from left to right as you face the oven so that later the prop may be inserted into the corrugations (Figure 6). One trick you can use to make the lid fit well is to lay the pencil or pen against the side of the box when marking (Figure 5). Don't glue this lid to the box; you'll need to remove it to move pots in and out of the oven.
To make the reflector flap, draw a line on the lid, forming a rectangle the same size as the oven opening. Cut around three sides and fold the resulting flap up forming the reflector (Figure 6). Foil this flap on the inside.
To make a prop, bend a 30 cm (12 in) piece of hanger wire as indicated in Figure 6. This can then be inserted into the corrugations as shown.
Next, turn the lid upside down and glue the oven bag (or other glazing material) in place. People have had great success using the turkey size oven bag (47.5 cm x 58.5 cm, 19 in x 23 1/2 in) applied as is, i.e., without opening it up. This makes a double layer of plastic. The two layers tend to separate from each other to form an airspace as the oven cooks. When using this method, it is important to also glue the bag closed on its open end. This stops water vapor from entering the bag and condensing. Alternately you can cut any size oven bag open to form a flat sheet large enough to cover the oven opening.
Improving Efficiency
The oven you have built should cook fine during most of the solar season. If you would like to improve the efficiency to be able to cook on more marginal days, you can modify your oven in any or all of the following ways:
- Make pieces of foiled cardboard the same size as the oven sides and place these in the wall spaces.
- Make a new reflector the size of the entire lid (see photo above).
- Make the drip pan using sheet metal, such as aluminum flashing. Paint this black and elevate this off the bottom of the oven slightly with small cardboard strips.
Making this cooker collapsible
- Main article: Collapsible Solar Box Cooker
Plans in other languages
See also
- The Easy Lid Cooker is a similar cooker with a much simpler lid.
- The Collapsible Solar Box Cooker is a collapsible version of this solar cooker.
- Solar Cooking Frequently-Asked Questions (FAQ)
- Tips and tricks